
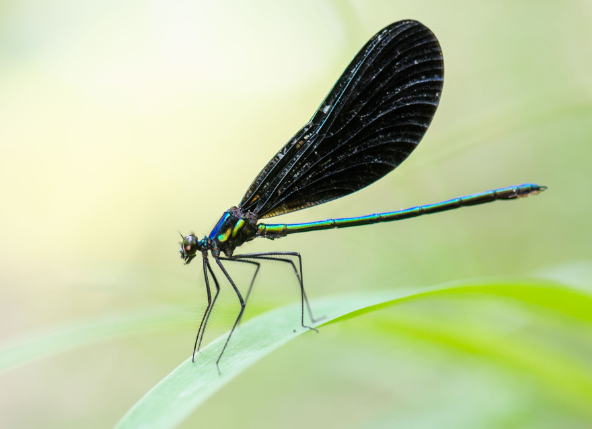
Macro photography of insects opens up a fascinating world that often goes unnoticed. By utilizing creative lighting techniques, you can capture incredible detail and vibrant colors that reveal the beauty of these tiny creatures.
1. Understanding Macro Photography
Macro photography allows you to take close-up shots, often magnifying subjects to capture details invisible to the naked eye. This genre usually requires specialized equipment like macro lenses or extension tubes. With magnification levels greater than 1:1, you can reveal intricate patterns, textures, and even behaviors of insects that are often missed in broader photography.
When photographing insects, it’s essential to consider various factors that can impact your results. The depth of field is particularly critical in macro photography; it can be very shallow, making it vital to choose your focus point carefully. A tripod is also recommended, as any slight shake can cause blurriness due to the close distances involved.
-
- Use a macro lens for high-quality close-ups.
-
- Consider a tripod for stabilization.
-
- Focus on your subject’s eyes or unique features.
-
- Experiment with aperture settings to achieve a desirable depth of field.
-
- Scout for insects in various environments such as gardens, parks, or near water sources.
2. Using Creative Lighting Techniques
Lighting plays a crucial role in any photography, but it is particularly important in macro photography, where details can easily be lost in shadows. Natural light can provide beautiful color and texture, but it often lacks the control needed for a perfect shot. Using an external flash or LED lights allows for more creativity, as you can manipulate light and shadows to highlight your subject’s features effectively.
For instance, backlighting your insect can produce a stunning silhouette effect, showcasing wings and other translucent parts. Similarly, using diffusers can soften harsh shadows and reduce glare, creating a more balanced image. Experimenting with colored gels on your lights can add unique artistic elements, transforming ordinary shots into spectacular visuals.
-
- Try using natural sunlight during the golden hours for softer shadows.
-
- Use external flashes with diffusers for well-lit subjects.
-
- Experiment with backlighting to emphasize shapes and colors.
-
- Incorporate colored gels to create artistic effects.
-
- Move around your subject to see how different angles affect lighting.
3. Choosing the Right Settings for Success
Each setting in the camera plays a significant role in the final outcome of your macro shots. The aperture setting will affect your depth of field—select a higher f-stop number (like f/16 or f/22) to get more of the subject in focus. However, higher f-stop settings often require longer exposure times, which necessitates the use of a tripod.
Shutter speed is also critical. Since you’ll be shooting at close range, even the slightest movement can result in a blurry image. A faster shutter speed (1/250s or quicker) can help mitigate this issue, especially when using flash. Experimenting with ISO settings is essential as well. A lower ISO will produce cleaner images, but you might need to increase it in low-light conditions.
-
- Set a high f-stop for more depth of field but expect longer exposures.
-
- Use fast shutter speeds to minimize motion blur.
-
- Keep ISO low for less noise; increase only when necessary.
-
- Utilize manual focus for precise control over subject focus.
-
- Review photos on-site to adjust settings as needed.
4. Post-Processing Techniques to Enhance Your Work
Post-processing is an integral part of photography that can elevate your initial shot to new heights. Programs like Adobe Lightroom and Photoshop allow you to adjust brightness, contrast, and color saturation, enhancing your images without losing their original beauty. Learning to utilize layer masks can help you target specific areas of your image, ensuring that different aspects of a macro photo stand out.
Furthermore, cropping and straightening can significantly improve composition. Consider using techniques like focus stacking, which involves taking multiple shots at different focus points and then merging them in post-production. This technique can help achieve sharper images, especially in macro work where depth of field can be limited.
-
- Use software like Lightroom for basic adjustments.
-
- Experiment with layer masks in Photoshop for targeted edits.
-
- Learn focus stacking for sharper images.
-
- Check for composition errors and crop as needed.
-
- Maintain a clean workflow for efficient editing.
Macro photography of insects with creative lighting can transform an ordinary subject into an extraordinary one. By applying these techniques and tips, you’ll discover the vibrant details within the tiny worlds that surround us. Grab your camera and get close—there’s so much beauty waiting to be captured!